 These instructions are available in PDF format for printing. Click on the icon to open, or
right click and choose 'Save Target As...' to save a copy.
These instructions are available in PDF format for printing. Click on the icon to open, or
right click and choose 'Save Target As...' to save a copy.
| Previous Page | Experiments Menu | Main Menu | Next Page |
|---|
These instructions are available in PDF format for printing. Click on the icon to open, or
right click and choose 'Save Target As...' to save a copy.
The Young's slits experiment is available live online. The experiment interface is via a Java applet. Only one person at a time can control the experiment, but others can observe. It takes about 15 minutes to carry out one full sweep of the diffraction pattern. When you open the next page, the Young's slits applet will run automatically if you have Java installed. The applet looks like this:
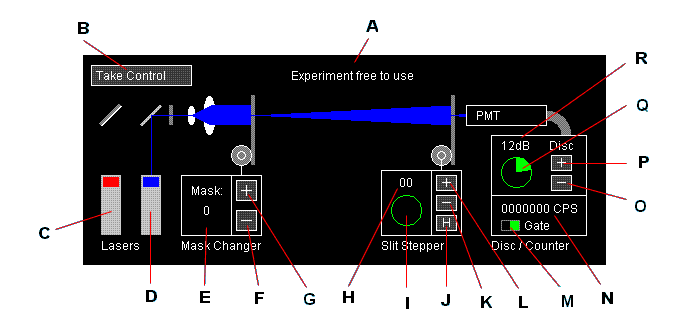
The picture above is a screen capture of the Young's slits applet. The controls and indications function as described in the following table.
| Key | Description |
|---|---|
| A | This text field shows the status of the experiment. The experiment may be free to use, in use by somebody else, or you may be in control. This is indicated here. |
| B | If the experiment is free to use, you can click here to take control. If you are in control, you can click here to release control. |
| C | Click here to turn the red laser on or off. |
| D | Click here to turn the blue 405nm laser on or off. |
| E | The selected slit mask is indicated here. |
| F | Six slit masks are available. Click here to select the previous mask. |
| G | Click here to select the next mask. |
| H | The current position of the acceptance slit is indicated here. It can be from 00 to 79. |
| I | This 'arc meter' gives a visual indication of how far through the sweep you are. |
| J | Click here to return the acceptance slit to position 00 (Home). |
| K | Click here to step the acceptance slit back one position (0.2646mm). |
| L | Click here to step the acceptance slit forward one position. |
| M | This indicator changes each time the count rate updates. |
| N | The count rate is displayed here in counts per second. It updates every 5 seconds. |
| O | Click here to reduce the discriminator level. It changes in steps of 6dB. The range available is 0dB to 54dB. |
| P | Click here to increase the discriminator level. |
| Q | This 'arc meter' gives a visual indication of how far through the discriminator range you are. |
| R | The discriminator level setting is displayed here. |
One of the aims during the design of this experiment and the Java software was to try to give it a 'hands-on' feel. For this reason, the software does little more than pass your commands on to the components of the experiment. It is up to you to select a laser, select a mask, set the discriminator level, step the acceptance slit and to decide when count rate readings are valid and record them. When you have a set of data, you can plot the graph. There is an Excel template for the graphs on the next page, that you can download if you want to. There are three worksheet tabs for different kinds of results.
Note that if you change something, such as the acceptance slit position, the next count rate reading will be invalid. This is normal behaviour for a laboratory counter / timer. The next reading is invalid because the counting period spanned part of the previous configuration and part of the new configuration. Therefore, when you step the acceptance slit, you must discard the next reading and record the one after that.
There are six masks to choose from. Their specifications are listed in the following table.
| Mask | No. of Slits | Slit Width | Slit Separation (a) |
|---|---|---|---|
| 1 | 2 | 0.08mm | 0.25mm |
| 2 | 2 | 0.04mm | 0.25mm |
| 3 | 2 | 0.08mm | 0.125mm |
| 4 | 2 | 0.04mm | ? |
| 5 | 1 | 0.08mm | N/A |
| 6 | 1 | 0.04mm | N/A |
It is up to you how you use the experiment, what readings you take and how you plot them. The following guidance provides some sensible procedures for using the experiment. It is advisable to follow them at least until you have some familiarity.
Note that the blue laser has been shown to give 'one photon at a time' intensity levels. The red laser is of higher intensity and is primarily there to allow the relationship between wavelength and diffraction pattern to be explored.
Keep in mind that the CPS reading is the number of photons counted in a five second period, divided by five. Hence it represents photon counts per second.
1. Check that it says 'Experiment free to use' (top middle).
2. Click 'Take Control'.
3. Check that it now says 'You have control' (top middle)
4. Check that the Gate indicator (bottom right) is changing state approximately every
5 seconds.
5. Turn the red laser off if necessary (by clicking on it) and the blue laser on.
6. Select Mask 2 using the Mask Changer buttons.
7. Click the H button to return the acceptance slit to position 00.
8. Set the discriminator level to 12dB.
9. Check that the experiment has responded. The beam should be blue, the Mask Changer
should show '2', the Slit Stepper should show '00' and the Discriminator should show
12dB.
10. Record the count rate (CPS bottom right).
11. Step the acceptance slit forward one position.
12. Discard the next count rate reading and record the one after that (by watching the
Gate indicator).
13. Repeat steps 11 and 12 for the rest of the acceptance slit positions up to 79.
14. Graph count rate against acceptance slit position.
Note how the count rate varies without you changing anything. This is due to statistical fluctuation caused by the random nature of the interactions. If you take two sets of results using the same mask, they will be slightly different. In fact, it is highly unlikely that you will ever get the same set of results twice.
To look at this characteristic of quantum interactions more objectively, you can plot the probability distribution.
1. Check that it says 'Experiment free to use' (top middle).
2. Click 'Take Control'.
3. Turn the red laser off if necessary (by clicking on it) and the blue laser on.
4. Click the H button to return the acceptance slit to position 00.
5. Set the discriminator level to 12dB.
6. Step the acceptance slit forwards to obtain a count rate of around 20 CPS.
7. Discard the next count rate reading (by watching the Gate indicator).
8. Without changing anything, record 100 consecutive count rate readings. This will take
about 8.5 minutes.
9. Plot against count rate, the number of times each count rate value occurred. For example,
if 18CPS turned up 15 times, plot 15 on the Y axis, against 18 on the X axis.
You should get a something like a 'normal distribution' although it will probably be a little 'rough' due to the relatively small number of results taken.
Try a double slit mask and then a single slit mask with the same slit width. Compare the diffraction patterns. Plot with a logarithmic count rate Y axis to emphasize the side peaks in the pattern.
Investigate the effect of changing the slit separation. Compare with the formula y = λD / a.
Investigate the effect of changing the slit width.
The red laser has a longer wavelength than the blue laser.
Try the same mask with the blue laser and then the red laser. Look at how the pattern changes when the wavelength is changed. Is it what you would expect? Compare with the formula y = λD / a.
See if you can calculate the wavelength of the red laser. Measure the distance between a number of fringes and divide by the number of fringe spacings to improve the accuracy of your prediction.
See if you can calculate the slit separation on mask 4.
The answers are given on page 8.
As explained previously, a discriminator is necessary to allow photons to be counted while rejecting noise. The discriminator can be varied over a range of 54dB corresponding to 500 times, to allow discriminator bias curves to be plotted. A typical procedure is as follows.
Dark Count:
1. Turn both lasers off.
2. Set the discriminator level to 0dB.
3. Wait for the count rate to update, but discard this result.
4. Record the next four count rate results.
5. Set the discriminator level to 6dB.
7. Repeat steps 3 and 4 for discriminator levels 6dB to 54dB.
8. Take the average of each group of four count rates.
9. Graph the average count rates against discriminator level.
Photon Count:
1. Turn the blue laser on (red should be off).
2. Step the acceptance slit to position 40.
3. Set the discriminator level to 0dB.
4. Wait for the count rate to update, but discard this result.
5. Record the next count rate result.
6. Repeat steps 4 and 5 for discriminator levels 6dB to 54dB.
7. Graph the count rates against discriminator level.
Try plotting the photon count discriminator bias curve with the count rate on a logarithmic Y axis. Note how the curve 'levels off ' towards the left (0dB) indicating that most photon events are being counted.
The experiment is on the next page.
| Page Title | Description |
|---|---|
| Background | Introduction to diffraction and Young's slits. |
| Information Encoding | This page attempts to show the similarities between the frequency content of an electrical waveform and the diffraction pattern of an object. |
| Project Construction | Information about how the experiment was built. |
| Single Photon Justification | Mathematical justification that the experiment can be considered to be diffracting individual photons. |
| Quiz | A multiple choice quiz (requires Java). |
| Online Experiment | The live interactive Young's slits experiment. Please read the instructions first. |
| Conclusion | Conclusion and references. |
| Previous Page | Experiments Menu | Main Menu | Next Page |
|---|