
Glass Blowing for Vacuum Devices
Filament Lamp B - Page 1 of 2
Early filament lamps had the pump seal on the end of the bulb. There are examples
of this on the museum
lamps page.
This is much easier to construct than the modern type with the pump tube between the
glass to metal seals. The old fashioned end seal style is therefore the approach
which I have adopted. It is possible to attach a tube to a smooth bulb and methods
are described in glass work books. I have found that it requires a very sharp flame
and is difficult to do. The method described here is not in my books, but it seems
to work quite well and I think it is a little easier.
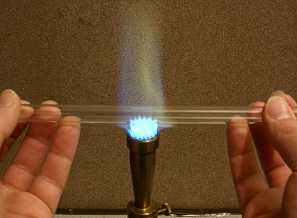 Starting with a 0.5m long 12mm diameter thin wall tube, I introduce the mid-point to a
medium flame. I rotate the tube in the flame using both hands.
Starting with a 0.5m long 12mm diameter thin wall tube, I introduce the mid-point to a
medium flame. I rotate the tube in the flame using both hands.
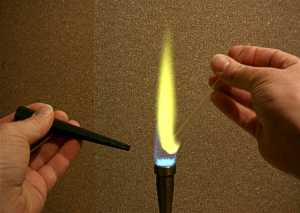
The lower surface of the tube should be just above the bright blue part of the flame.
This is the hottest part of the flame. I continue rotating the tube in the flame until
it begins to soften.
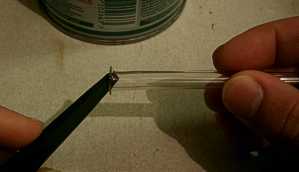
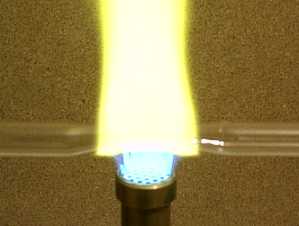 When the glass softens, the flame turns an orangy yellow colour. I draw the two halves
of the tube apart. The tube thins in the middle as can be seen in the picture.
I keep drawing the two halves apart until there are two cones, meeting in the middle.
Each should be about 20mm long. I keep the middle part in the flame so that it collapses
and seals. Finally, I draw the two halves completely apart. With care, both halves can be
used to blow bulbs.
When the glass softens, the flame turns an orangy yellow colour. I draw the two halves
of the tube apart. The tube thins in the middle as can be seen in the picture.
I keep drawing the two halves apart until there are two cones, meeting in the middle.
Each should be about 20mm long. I keep the middle part in the flame so that it collapses
and seals. Finally, I draw the two halves completely apart. With care, both halves can be
used to blow bulbs.
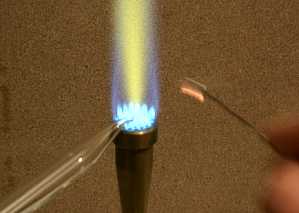 If there is a large solid mass of glass on the end, it can be drawn away using another
piece of glass or a piece of wire.
If there is a large solid mass of glass on the end, it can be drawn away using another
piece of glass or a piece of wire.
A bulb can then be blown as described previously. I start blowing the bulb about 15mm from
the pointed end of the tube. I avoid heating the pointed end. The aim is to end up with a
bulb which has a cone of glass sticking out of the end.
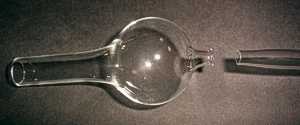
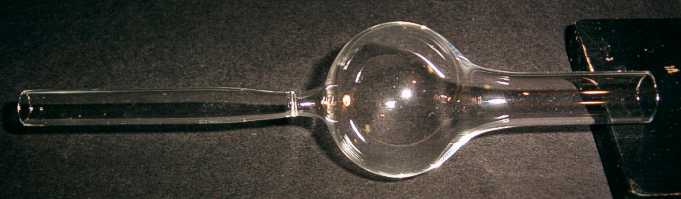
 This is the completed bulb. It is 35mm in diameter. The pumping tube can now be attached
to the protuberance on the end of the bulb. I heat the tip of the protuberance by rotating
it in the flame. I take care not to heat the bulb too much or it will start to collapse.
I then remove it from the flame and blow a small bulb on the end, about 8mm in diameter.
I then heat it again so that the end of the small bulb flattens. I then remove it from
the flame and blow very hard so that the small bulb bursts. I carefully remove all the
thin glass and heat the end again a little to melt the sharp edges.
This is the completed bulb. It is 35mm in diameter. The pumping tube can now be attached
to the protuberance on the end of the bulb. I heat the tip of the protuberance by rotating
it in the flame. I take care not to heat the bulb too much or it will start to collapse.
I then remove it from the flame and blow a small bulb on the end, about 8mm in diameter.
I then heat it again so that the end of the small bulb flattens. I then remove it from
the flame and blow very hard so that the small bulb bursts. I carefully remove all the
thin glass and heat the end again a little to melt the sharp edges.
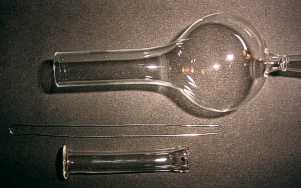
 A length of 8mm diameter thin wall tube is then attached. If the diameter of the
protuberance on the bulb is smaller than 8mm, the tube can be drawn down slightly using
the same method as used above. The tube can then be cut where it has a diameter which
matches the protuberance. The two prepared ends are shown in the picture. They are now
ready to be joined.
A length of 8mm diameter thin wall tube is then attached. If the diameter of the
protuberance on the bulb is smaller than 8mm, the tube can be drawn down slightly using
the same method as used above. The tube can then be cut where it has a diameter which
matches the protuberance. The two prepared ends are shown in the picture. They are now
ready to be joined.
 It is very easy to write the whole thing off at this stage, which can be very frustrating.
The most critical thing at this stage is to get the temperature of the glass right. If it
is not hot enough it will not seal all the way around. If it is too hot, it will thicken
seriously and then almost certainly crack during cooling.
It is very easy to write the whole thing off at this stage, which can be very frustrating.
The most critical thing at this stage is to get the temperature of the glass right. If it
is not hot enough it will not seal all the way around. If it is too hot, it will thicken
seriously and then almost certainly crack during cooling.
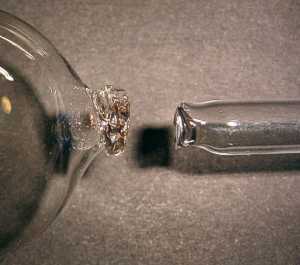
In the picture on the left, the glass was much too hot. This caused it to deform when
the two parts were brought together. It then cracked during cooling. Generally, the
uglier a joint looks, the more likely it is to fail.
 I heat both ends to about the same temperature as when rounding the end of a tube. If the
end of the tube starts to close, it is too hot. I gently press the two halves together.
As it cools, I gently pull on the far ends of the tubes. This tends to thin the joint
slightly and to straighten it.
I heat both ends to about the same temperature as when rounding the end of a tube. If the
end of the tube starts to close, it is too hot. I gently press the two halves together.
As it cools, I gently pull on the far ends of the tubes. This tends to thin the joint
slightly and to straighten it.
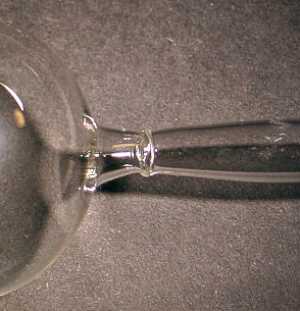
I then anneal it, wrap it in ceramic wool and allow it to cool slowly for ten minutes.
The completed joint, shown on the left, is not a masterpiece, but it is reasonably sound.
The bulb with the pump tube attached is shown below.
 The next step is to make the filament support and glass to metal seals. I take a length of
8mm diameter thin wall tube and introduce one end to a medium flame so that the end gets
the most heat. I rotate it in the flame with one hand and have a small graphite cone
ready in the other hand.
The next step is to make the filament support and glass to metal seals. I take a length of
8mm diameter thin wall tube and introduce one end to a medium flame so that the end gets
the most heat. I rotate it in the flame with one hand and have a small graphite cone
ready in the other hand.
The end of the tube should be heated to the consistency of Plasticine. It must not be
heated to the point where the end begins to close.
 I remove the tube from the flame and immediately insert the graphite cone. The tip of the
cone touches one inside wall of the tube. I touch the side of the cone gently against
the inside of the opposite wall. While holding the cone steady with one hand, I rotate
the tube with the other to flare out the end of the tube. I aim to get the outside
diameter of the flared end the same as the outside diameter of the larger tube (12mm).
I then insulate it to cool slowly.
I remove the tube from the flame and immediately insert the graphite cone. The tip of the
cone touches one inside wall of the tube. I touch the side of the cone gently against
the inside of the opposite wall. While holding the cone steady with one hand, I rotate
the tube with the other to flare out the end of the tube. I aim to get the outside
diameter of the flared end the same as the outside diameter of the larger tube (12mm).
I then insulate it to cool slowly.
 I cut the flared tube to length so that when fitted cut end first into the end of the
bulb tube, it reaches just inside the bulb. The required proportions are shown in the
photograph.
I cut the flared tube to length so that when fitted cut end first into the end of the
bulb tube, it reaches just inside the bulb. The required proportions are shown in the
photograph.
I then fold a length of nickel/iron (Ni48/Fe52) wire in half. I make the length such
that it is about 35mm longer than the flared tube when folded. The two halves of the
wire must be parallel and 2 to 3mm apart.