
| Electronics Menu | Teralab Main Menu |
|---|
This project provides eight unipolar voltage outputs and eight relays which can be controlled via an RS232 serial port. In conjunction with a digital multimeter (DMM) with remote control capability, it makes a useful and flexible automatic test system. The project is built around an 8031 microcontroler, programmed in assembly language. Additional software is required for a PC to send command sequences to the microcontroler and DMM and to receive measurement results from the DMM. The commands to control the relays and set the output voltages are simple ASCII text stings allowing the system to be tested using a terminal program, such as Windows HyperTerminal (which is in the Accessories folder of Microsoft Windows).
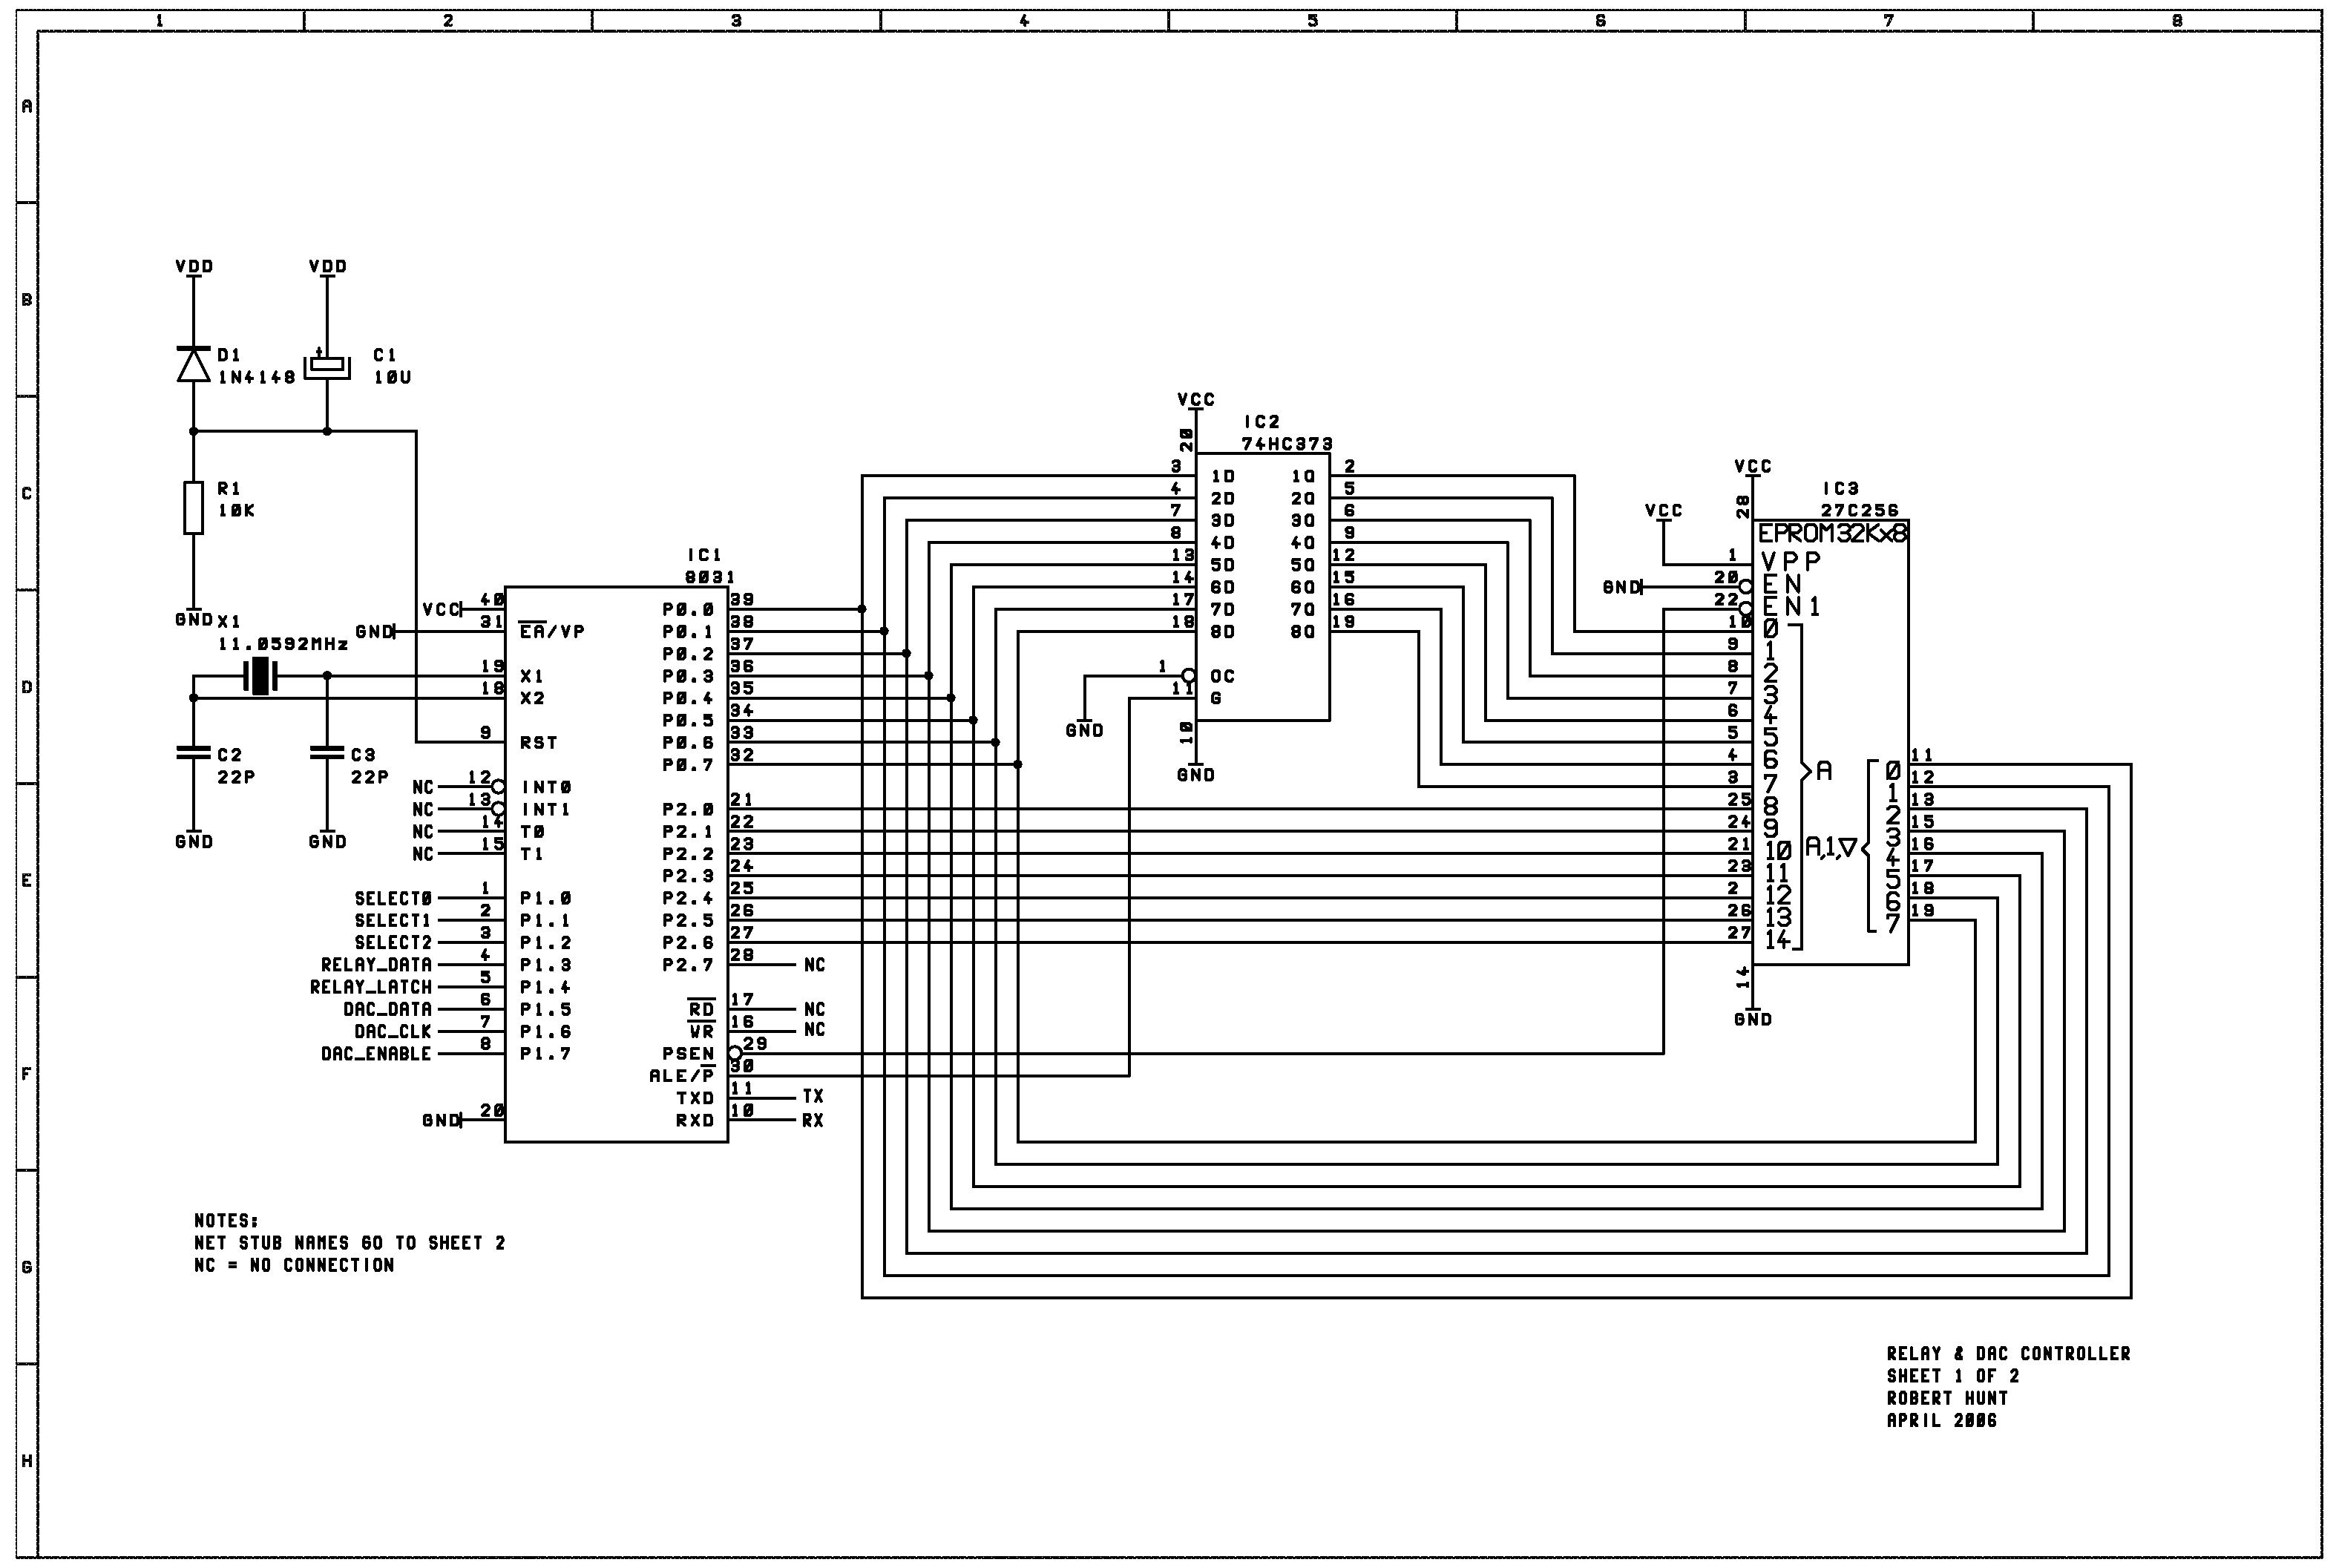
Click on the schematics below to see them in higher resolution. The microcontroller circuitry is shown on the first sheet. IC1 on the left is the 8031 microcontroler. IC2 is an address latch for the EPROM (IC3) which holds the program. No additional RAM is required, beyond that which is internal to IC1. The discrete components on the left of the first schematic provide the power up reset and the crystal clock for IC1. The named signals on pins 1 to 8, 10 and 11 of IC1 control the peripheral devices on the second schematic sheet.
The peripheral devices are shown on the second schematic. Top left (IC4) is the bi-directional RS232 port. IC5 in the middle is the digital to analogue converter (DAC) select decoder. It allows the microcontroller to select any one of the eight DACs in order to set it's output voltage. Only one of DACs is shown (IC8). Its analogue output is buffered by IC9. The circuitry of IC8 and IC9 is repeated eight times. The REF, DIN and SCLK pins of the eight DACs are connected in parallel. The /CS pins are connected to the respective Y outputs of IC5.
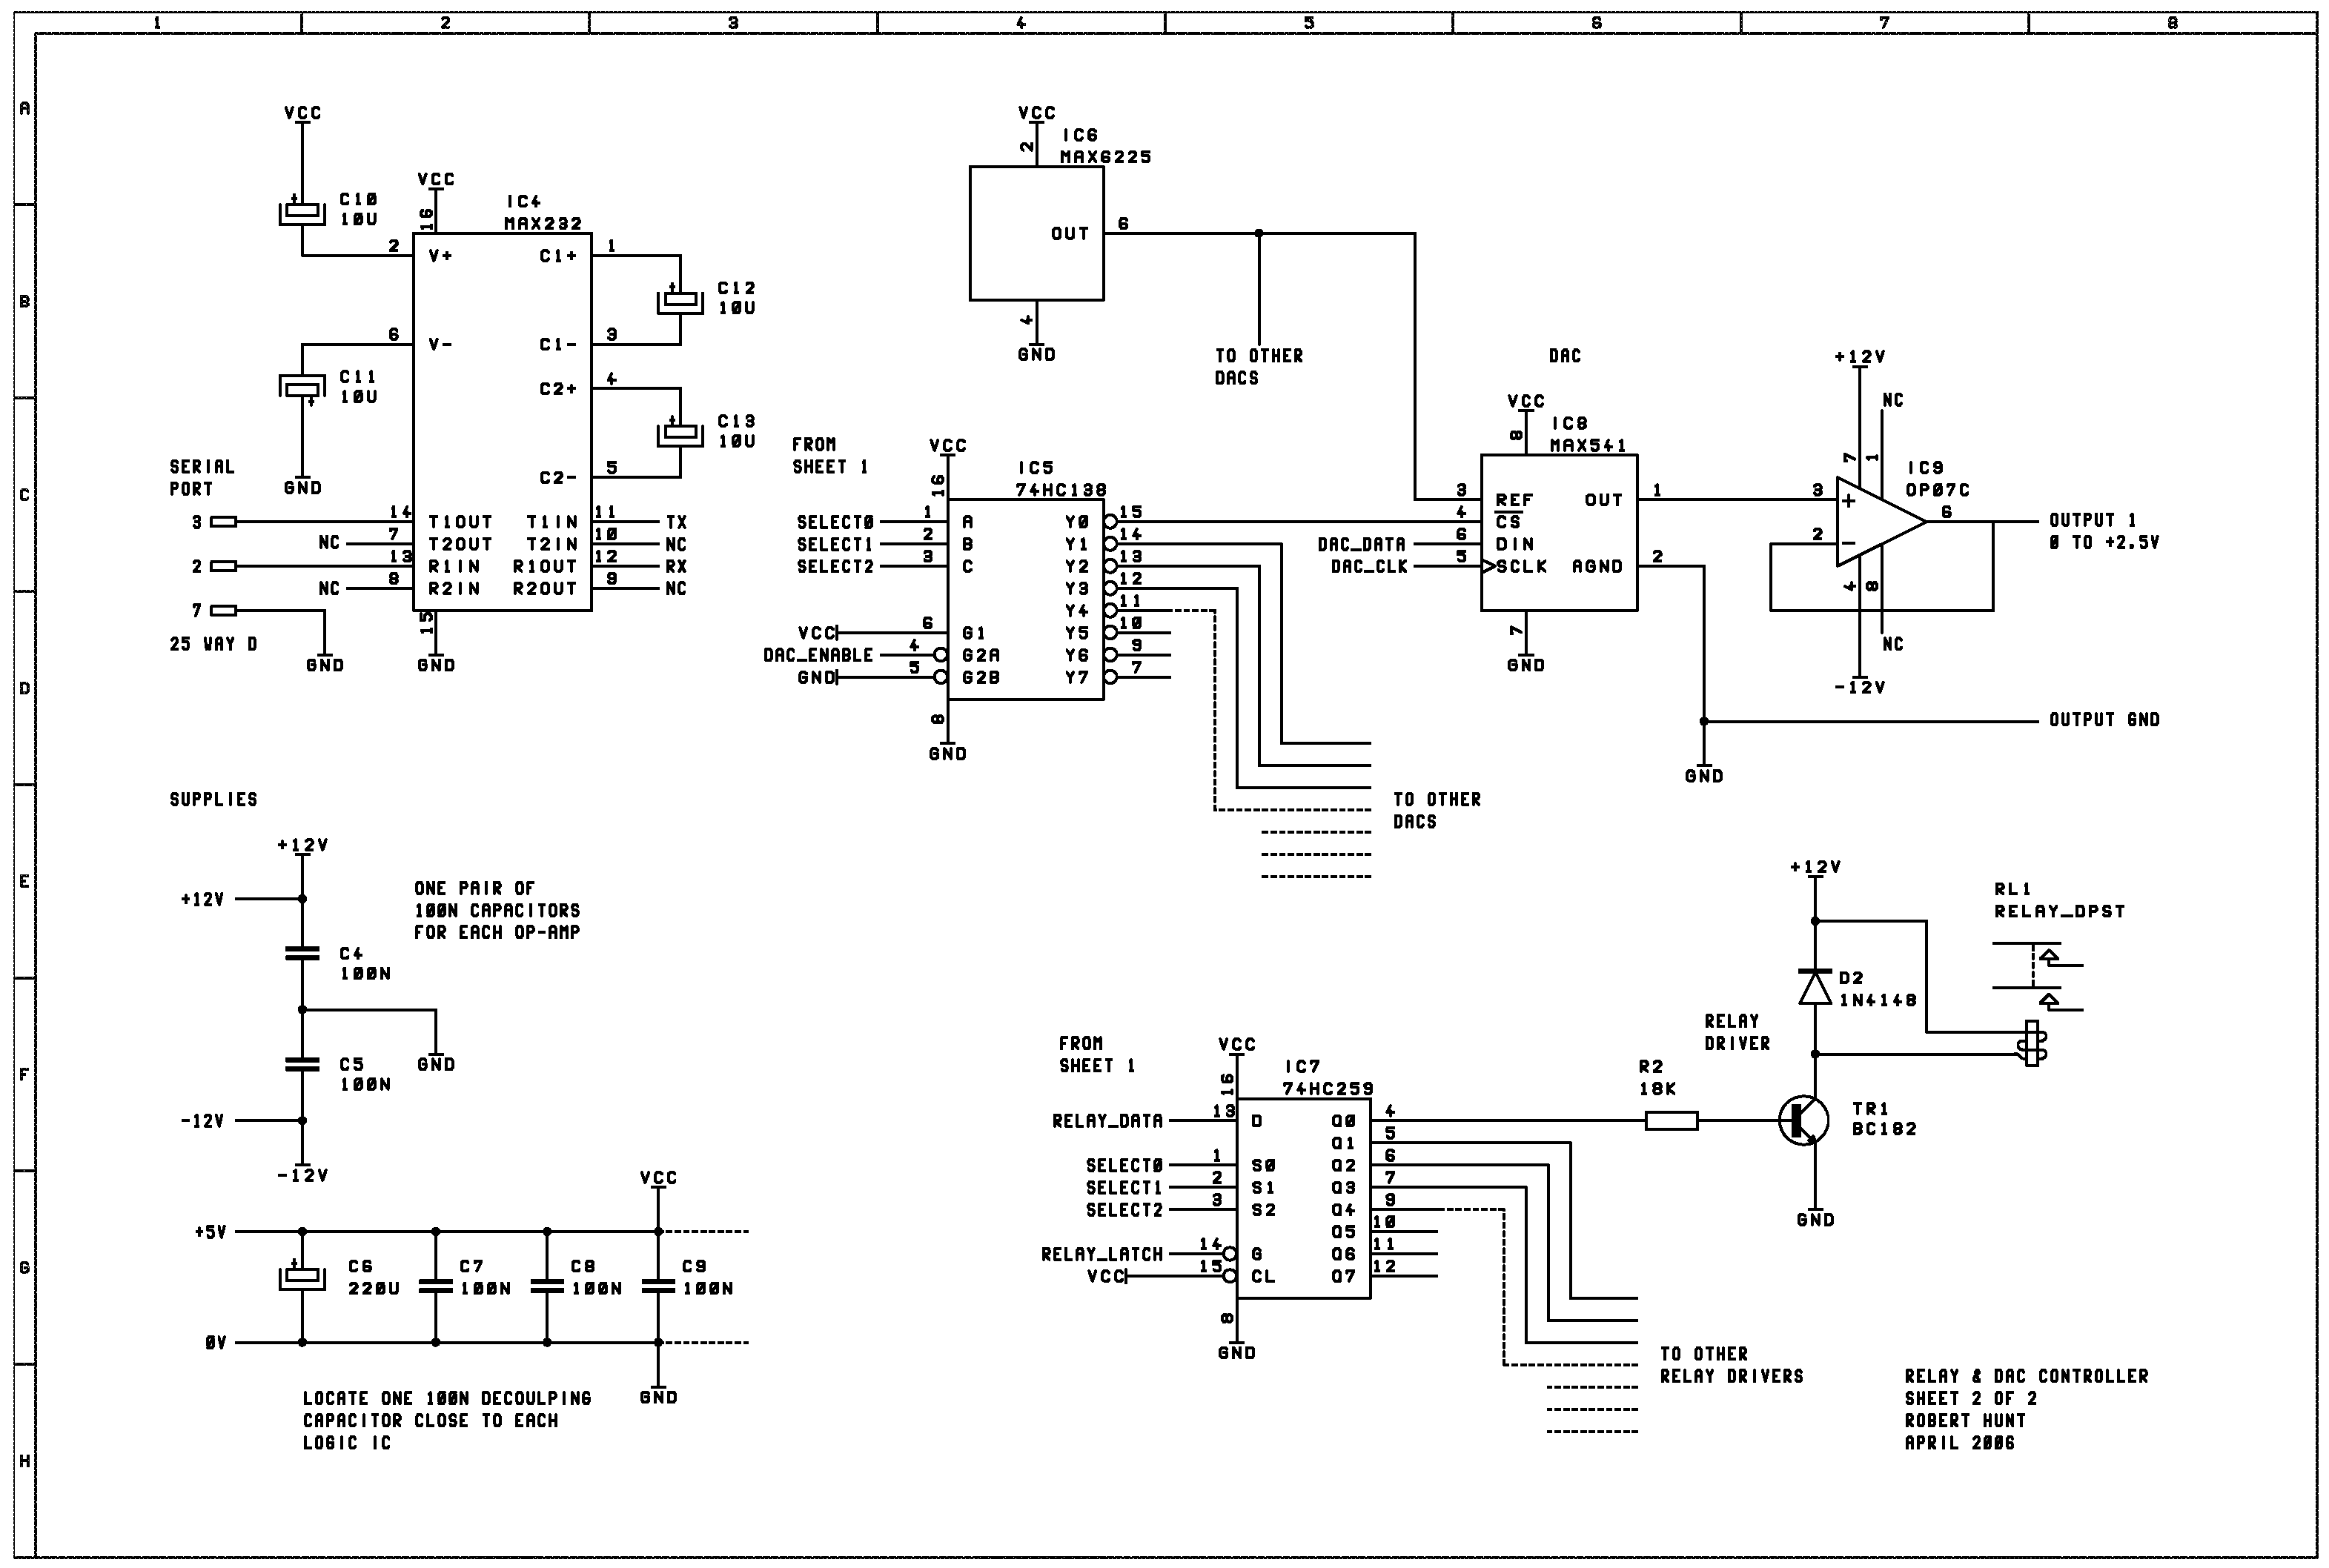
To set the output voltage of one of the DACs, the microcontroller selects the appropriate DAC by setting a number from 0 to 7 on the SELECT lines. DAC_ENABLE is then set low. This sets the /CS pin on the respective DAC low. The 16 bit word is then serially shifted into the DAC, MSB first via the DAC_DATA and DAC_CLK lines. DAC_ENABLE is then set high again. This loads the DAC latch by setting /CS high again.
The relays are controlled in a similar way. The relay to be opened or closed is selected by the microcontroller, again by setting a number from 0 to 7 on the SELECT lines. The RELAY_DATA line is then set either high to energize the relay, or low to release it. RELAY_LATCH is then pulsed low to latch the new state for the relay into IC7 (which is an 8 bit addressable latch). Only one relay driver (TR1) is shown. This is repeated eight times. D2 provides a path for the back EMF when the relay de-energizes, thus preventing a high voltage developing, which could damage TR1. RL1 is actually a pair of reed relays, with the coils connected in parallel. The relays have 12V 850Ω coils. A pair therefore gives TR1 a collector current of 28mA. If a relay with a lower resistance coil were used, it may be necessary to uprate TR1.
![]() For a parts list in Excel format, right click on the icon and choose 'Save Target As...'.
For a parts list in Excel format, right click on the icon and choose 'Save Target As...'.
The assembly code listing for IC1 and the Intel HEX EPROM programming file can be
downloaded by right clicking on the following file names and selecting
'Save Target As...'.
RelayDAC.asm
RelayDAC.hex
Terminal emulation: VT-100
Local echo: off
CR->CR/LF: off
Baud rate: 9600
Data bits: 8
Stop bits: 1
Parity: none
Flow control: none
Caps Lock: on
HELP Displays help text.
RESET Restarts the relay and DAC controller.
RLn OPEN Where n is from 0 to 7, opens the associated relay contact pair.
RLn CLOSE Where n is from 0 to 7, closes the associated relay contact pair.
DACn hhhh Where n is from 0 to 7, loads the associated DAC with value hhhh.
hhhh must be an ASCII hexadecimal value from 0000 to FFFF and must always consist
of 4 characters. A value of 0000 sets the output to 0V. FFFF sets it to full scale
(2.5V).
! recalls the previous command.
ENTER key executes a command.
| Electronics Menu | Teralab Main Menu |
|---|